
This web site is under construction and contains details of products that will become available in 2024. Details of current DryFire products may be found at: www.dryfire.com
DPS setup
DPS is the DryFire Projection System - details may be found here.
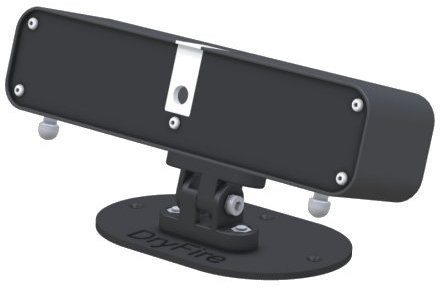
The image below shows the DPS Sensor Unit (DPS-SU) (also simply called "the simulator") mounted on the optional DPS Adjustable Mount (DPS-AM).
Requirements
- Check the room and other requirements article.
- Check that you have everything you need..
- DPS comes with the DPS Sensor Unit (DPS-SU), Standard Gun Assembly (SGA) and wrap round trigger switch.
- The optional TS22 trigger switch is available for those who prefer a behind-the-blade trigger switch.
- The optional DPS Adjustable Mount (DPS-AM) makes it easy to adjust and lock the viewing angle.
The following items are not supplied by Wordcraft:
- Suitable PC or laptop.
- USB port or USB charger plug and micro USB cable to recharge the DPS-SU battery.
- PC data projector.
- Large screen or suitable reflective wall.
DPS-SU battery
The DPS-SU contains an 18650 Lithium Ion rechargeable battery. Postal and shipping regulations mean we cannot ship the battery fully charged.
Before you start: DPS-SU should be connected to a USB port or a USB charger plug using a suitable cable and left on charge until the LED on the back changes from red to green - this may take some time - a few hours. DPS-SU has a USB Type B-micro charging socket like many smartphones, tablets and Kindles.
Note: the battery level is shown in the bottom left corner of the screen when the DryFire software is running. You can, if you wish, leave the USB charging cable connected when using the system - but take care not to trip over cables.
To save battery power DPS will automatically put itself to sleep (with the blue on/off switch flashing once every 5 seconds) if it is not used for a while. Press the on/off switch twice to turn DPS off then back on again.
Important note:
- Always turn DPS off after use.
- The battery should never need replacement.
- Please do not attempt to remove or replace the battery.
If it is not turned off the battery can usually be recharged next time DPS is connected to a USB port or charger.
There is the remote possibility that the battery could go into "deep discharge" and not be capable of recharging if the system is left switched on for a long time without being connected to a powered USB port or charger.
Please contact us if you find that the battery refuses to charge and DPS refuses to switch on.
Firmware update
Each time the DryFire software connects to DPS it checks if a newer version of the DPS firmware is available and offers you the chance to do an update.
At the start of the update it prepares the files (this stage takes about half a minute) and then it does the update - this can take several minutes as it updates the firmware on all three processors inside DPS. A green thermometer bar will show progress.
Note for the technically minded: the update is done "over the air". The firmware is downloaded over the Internet from the Wordcraft web site and then sent to DPS via the Wi-Fi link from your PC/laptop.
Quick setup
Hardware and Wi-Fi setup
- Ensure your projector is connected to your PC/laptop, switched on and working correctly in extended mode - see the room and other requirements article..
- Ensure the projected image:
- is truly rectangular - no sloping sides - use the keystoning function to adjust this. Check the projector is square on and central to the screen.
- occupies as much of the screen as possible - move the projector back/forward to do this,
- has the top of the image horizontal at the top of the screen - use the projectors' feet to adjust this,
- has the sides of the image within the boundaries of the screen.
- The DPS-SU should be between 0.5m and 1.0 m from the floor (the DIY stand is ideal for this) and must be located so it can see the full width of the projected image.
Measure the width of the image and enter it into the calculator below. The distance to the screen is measured from the half way point between the feet of the DPS-SU.
Width of screen image:
Distance from screen:
- Fit the trigger switch and SGA to your shotgun.
SGA fitting
The SGA should be mounted directly under the barrel and aligned with it - anywhere between the forend and muzzle - it looks neater close to the forend as shown in the photos here.
It should be fitted firmly - but not too tight or you risk breaking the clamp. Use a strip of masking type between the barrel and the clamp if you are concerned about it slipping
Note about the SGA battery
SGA is powered by an internal CR2032 button cell battery which does not require charging. The battery should be replaced (by undoing the four screws on the bottom of SGA) when the red LED on SGA no longer flashes (or flashes weakly) when you press the trigger switch.
- Place your laptop on a suitable surface (preferably to one side of your shooting position) where it won't interfere with your gun movement.
- Download and install the latest DryFire software - do not run it yet.
- Press the DPS-SU power switch - it will glow blue when on.
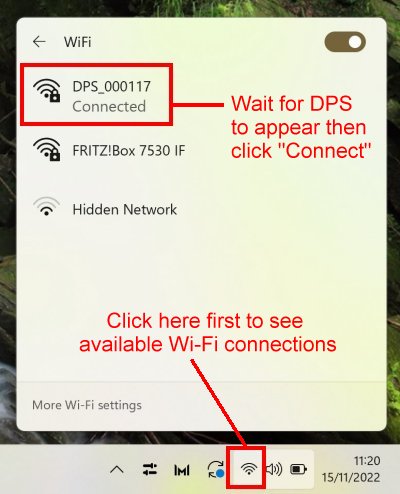
- Use the Wi-Fi setup function on your PC to view Wi-Fi networks available - you will see one with a name such as "DPS_nnnnnn" - click on it and click on "Connect".
- You may be asked for an SSID and key. They are:
- SSID: the name for your unit shown on the list of WiFi devices. E.g. DPS_000117
- Key/password: "DryFireProjSys"
- Run the DryFire software - initially you will see a message "Waiting for simulator" (bottom left).
- The DryFire software will go into setup mode as soon as it connects to DPS-SU.
Note about Wi-Fi
Your PC/laptop must be connected to the Internet (via your home Wi-Fi router) to download DryFire software, to get software updates and to send support requests.
The Wi-Fi connection between your PC/laptop and the DPS-SU is local, it does not go through your router. (Technically, the DPS-SU is an Access Point which allows the PC to connect to it.) While connected to DPS your PC/laptop is not connected to the Internet.
We recommend using your smartphone or tablet connected to your home Wi-Fi router to read the DryFire User Guide while the software is running and DPS is connected.
Software setup
- Check your PC speakers are switched on and working - or you won't hear sound feedback and "bangs".
- The measurement reference point on the DPS-SU is the centre point between the two feet.
- Enter the measurements requested in metres:
- Simulator to screen. E.g. 1.80m.
- Simulator from floor. E.g. 0.80m.
- Screen to floor (from the floor to the bottom of the projected image). E.g. 0.60m
- Shooter from screen. E.g. 2.75m
- After entering the measurements click on "Next" - do not click on "Advanced".
- The software will project a vertical white line. Measure it and enter the value in millimetres. E.g. 187mm.
- The software will display a white diamond at the top centre of the screen along with with a picture-in-picture image of what the central camera is seeing.
Adjust DPS-SU (using the feet, tripod or DPS-AM) so the diamond is not distorted and is at the top centre of the camera image.
Click on "Retry" if the camera image freezes.
The software will display traffic lights to help you:
- Red: a long way off
- Red and amber: getting closer
- Amber: fairly close
- Green and amber: very close (in fact "good enough")
- Green: perfect!
Click "Done" when you are happy (either green alone or green and amber).
- The software will now display a series of dots one after the other (six columns with three dots in each column).
Aim at each dot and press the trigger switch twice - you will hear a confirmation beep after the second shot.
- After the final dot you will have a chance to shoot at the screen to see where your shots are going.
- The normal DryFire screen will now appear ready for you to select a discipline and start shooting!
Future calibration, alignment and setup
When the software next runs it checks that the projector and DPS-SU have not moved - it will automatically start the setup procedure if it is not happy.
Check there is no wobble if you are using the DPS-SU screw-in feet (i.e. both feet are at the same length).
To make future setup easy you can mark the feet positions with sticky dots and to mark the floor locations of your tables/stands with masking tape.
You can do gun alignment (if you feel your shots are off or if someone else is shooting) by going to "Settings", "Calibration", "Alignment", "Align current shooter".
You can restart the whole setup procedure by going to "Settings", "Calibration", "Full calibration", "Calibrate".
Your first shots
- Click on "Simulation", select "Trap", then "DTL" then "Start".
- Click on the triangular play symbol - this will change to a green microphone symbol.
- The software will "beep" when it is listening for you to call "Pull".
- Take up your normal shooting position with gun mounted and a hold position above the trap house.
- Call "Pull", acquire the target, swing through and fire.
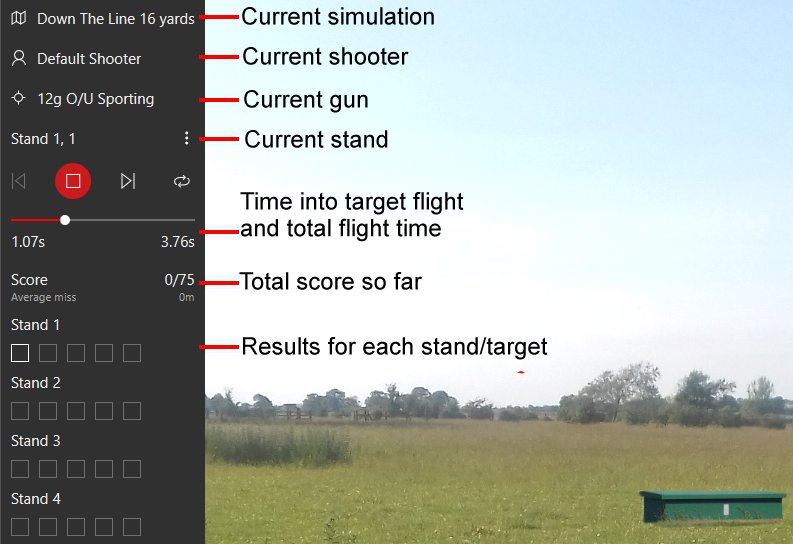
- Congratulations - you have taken your first DryFire target.
- Don't worry if you missed - call "Pull" a few times to see where the target starts and where you would like to hit it. Make a mental note of your ideal hold point then try again. Don't forget lead!
Consistent errors
If you are consistently shooting high/low/left/right:
- Click on "Settings" (bottom left).
- Click on "Calibration".
- Click on "Align current shooter".
- Aim straight ahead at eye height and press the trigger.
- Shoot twice more at the dot displayed.
- Shoot at the bullseye to check shots are going where they should do.
- Click "Done" when you are ready to move on.
Flashing lights on the DPS-SU
Power switch
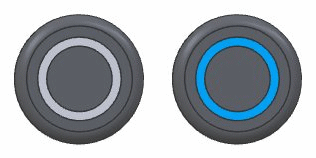
- The switch shows blue when on.
- The switch flashes blue every second when the battery level is low
- The switch flashes blue once every 5 seconds when the DPS-SU has gone into "sleep mode".
Note: To save battery power DPS-SU will enter sleep mode when the PC software does not talk to it for a while - 10 minutes by default. The WiFi connection is lost in this mode so you will have to press the switch twice (off then on) to restart.
This value can be changed from "Settings", "Connection", "Auto Sleep Time". A lower value will save battery power but may mean you have to restart the system if you start chatting for too long!
 |
 |
 |
 |
| Off | On | Battery low Flash every second |
Asleep Flash every 5 secs. |
LED
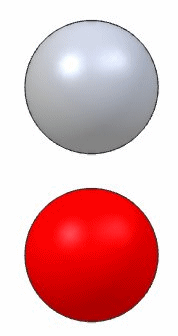
- The red LED comes on for one second on power on.
- The red LED flashes steadily (1.25 seconds on, 1.25 seconds off) when waiting for a Wi-Fi connected to the PC.
- The red LED flashes once every 2.5 seconds when connected by Wi-Fi to the PC.
- The green LED comes on when the acoustic release (microphone!) is enabled waiting for you to call "Pull".
 |
 |
 |
 |
| Initial power on Stays on for 1 sec. |
Setting up Wi-Fi Slow steady flashing |
Wi-Fi connected Flash every 2.5 secs. |
Acoustic release ready Call "Pull" to release |
Acrylic front panel
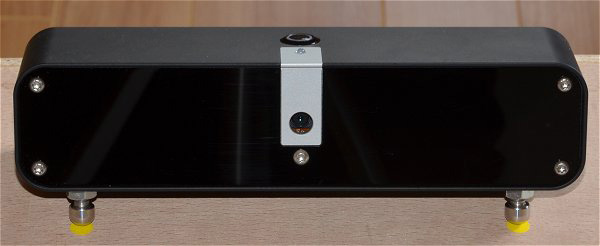
The acrylic front panel of the DPS-SU functions as a filter to allow infrared light (and only infrared light) to pass through to the cameras which detect your shots. To the naked eye it appears opaque - because the human eye cannot see in the infrared part of the spectrum.
The panel must be kept clean and free from smudges, finger marks and scratches.
Be very careful not to scratch the front panel - use a clean soft cloth or tissue if you feel the need to clean it.
Important don't use any fluids that could enter the unit - water and electronics don't mix!
If the panel becomes very dirty it should be carefully removed (you will need a T6 Torx screwdriver to remove the 5 screws), washed in soapy water (washing-up liquid), rinsed well, dried with a clean cloth and replaced when fully dry.
Camera setup
You need do this only if your shots are not detected or the system is seeing stray shots.
- Make sure no direct light reaches the wall/screen Check windows, doors, ceiling lights and wall lights - and possible reflections.
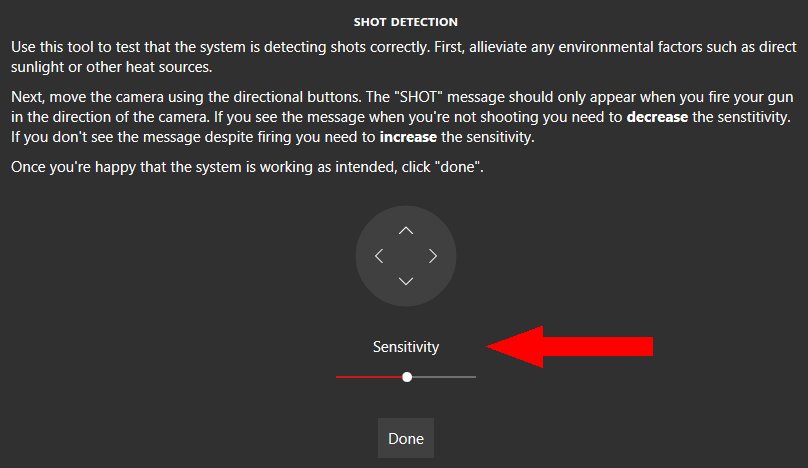
- From "Settings" select "Calibration" then "Adjust shot detection".
- Use the compass rose to move the camera head around and try shooting at the area it is pointing to. You should see the "SHOT" message if the system detects your shot.
- If your shot isn't detected, drag the white spot slightly to the right to increase the camera sensitivity then try again.
- You must find the maximum sensitivity without the system seeing background light.
- If you can't get the right setting there will almost certainly be stray light reaching the wall or screen.
Microphone setup

- From "Settings" select "Target release".
- Change the "Threshold" setting and call "Pull" - the word "Pull" will be shown in red next to the threshold value if the system hears your call.
- Continue adjusting the threshold until your call is heard.
During normal use
- The system starts listening after you have selected a simulation and after you have clicked on the triangular "Play" symbol on the control bar (top left).
- The system will beep, and the symbol will change to a green microphone, when the system is ready.
- After shooting at each target you should wait for the beep before calling for the next.
Software options: "Add-ons"
- After purchasing an add-on your invoice will include a token or key looking like this:
ABC123-DEF456-GHI789-JKL012.
- Keys are stored in the simulator's memory so ensure it is switched on and connected to the PC.
- Run the DryFire software.
- Select "Settings" then "Add-ons" and find the field labelled "Apply key".
- Enter the key provided with your invoice and click on "Apply".
- A tick will appear when the key has been applied.
- You now have access to all the features of the new add-on.
- A full list of the add-ons you have purchased is shown above the "Apply key" field.