
This web site is under construction and contains details of products that will become available in 2024. Details of current DryFire products may be found at: www.dryfire.com
DLS setup
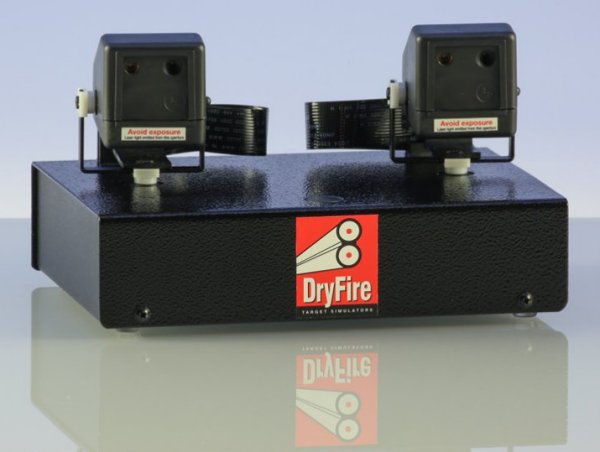
DLS is the DryFire Laser System - details may be found here.
Requirements
- Check the room and other requirements article.
- Check that you have everything you need..
- DLS comes with the DLS simulator, Standard Gun Assembly (SGA), wrap round trigger switch, power supply and USB cable.
- The optional TS22 trigger switch is available for those who prefer a behind-the-blade trigger switch.
The following item is not supplied by Wordcraft:
- Suitable PC or laptop.
Quick setup
Before you start
Targets are laser dots moving across a blank wall - DLS does not display a background. This may not be as visually attractive as the backgrounds and targets generated by the DryFire Projection System (DPS) but it can result it incredibly accurate targets making use of all the wall space in front of you - and sometimes the side walls and even the ceiling!
Stray light
DLS looks at a much larger area than DPS so it is important to check that there is no stray bright light (or reflections) anywhere between 90 degrees left and 90 degrees right of the simulator.
DLS will work in a reasonably lit room as long as no bright light falls directly in front of the simulator.
Post-It notes are a huge help for accurate target trajectories and accurate feedback. Draw diagonal lines on a few and set them up as shown:

- 1: directly ahead of the simulator and at the same height as the flat top of the base.
- 2: directly ahead of your line of sight.
Stand with your gun in your normal shooting position, take up your normal shooting stance and point your gun directly ahead of you. Get someone to check that the barrel is horizontal and measure the distance from the floor to the gun rib. That is the height where you place the Post-It note
Leave this Post-It note in place at all times - you will use it each time you do muzzle alignment of the Standard Gun Assembly (SGA).
- 3: this is added after you have the system working and marks the point where targets are released for trap disciplines such as ATA Trap. Alternatively it could mark your hold point.
- 4: this is added after you have the system working and marks the hold point for Skeet Stand 4 High House.
- 5: this is added after you have the system working and marks the hold point for Skeet Stand 4 Low House.
Obviously you can use Post-It notes to mark any other positions you find helpful.
In the case of wide crossers, like Skeet Stand 4 Doubles, the targets will probably start on the side walls but your hold points are likely to be on the wall in front of you - adjust things until you feel comfortable..
Hardware setup
- Fit the trigger switch and SGA to your shotgun.
SGA fitting
The SGA should be mounted directly under the barrel and aligned with it - anywhere between the forend and muzzle - it looks neater close to the forend as shown in the photos here.
It should be fitted firmly - but not too tight or you risk breaking the clamp. Use a strip of masking type between the barrel and the clamp if you are concerned about it slipping
Note about the SGA battery
SGA is powered by an internal CR2032 button cell battery which does not require charging. The battery should be replaced (by undoing the four screws on the bottom of SGA) when the red LED on SGA no longer flashes (or flashes weakly) when you press the trigger switch.
- Place the simulator about 1.5m from the wall and between 0.5m and 1.0 m from the floor. The DIY stand is ideal for this. Check that the simulator is square on to the wall and directly in line with the first Post-It note.
- Place your PC/laptop on a suitable surface where it will not interfere with your gun movement.
- With your Post-It notes in place, and using the central circle on the simulator as a reference point, measure and write down:
- the distance of the simulator from the wall - simulator to the first Post-It note,
- the height of simulator from the floor - the height of the first Post-it note,
- the distance you are standing from the wall - 2.5m is a good distance,
- your eye height in the shooting stance - the height of the second Post-it note.
Important note about measurements
Measurements may be in metric (recommended) or imperial. In metric everything is in metres so a simulator height of 750mm or 75cm is 0.75m. Entering "70" will be interpreted as 70 metres - which is interesting (but wrong)!
Software setup
- Check your PC/laptop speakers are switched on and working - or you won't hear sound feedback or "bangs".
Do not connect your simulator to your PC/laptop at this stage.
- Download the latest DryFire software. We recommend scanning the download at this stage.
- Install the DryFire software - click to go ahead on any warnings.
- Connect the simulator to power and to a USB port - the two heads should nod - click here if they don't.
- Run the DryFire software.
- When requested, enter the measurements you previously wrote down.
- After entering the measurements click on "Next" - do not click on "Advanced".
Muzzle alignment (calibration)
- You will be asked to shoot at your straight ahead position marked by the second Post-It note.
Stand at your normal shooting location, take up your normal shooting stance, use the bead to aim at the centre of the Post-It note and press the trigger - you will hear a "bang".
Important note: there is no laser dot visible during this first step but the camera head is looking for the location of your first shot.
- A laser dot will now appear - aim at it (bead on the laser dot, not on the centre of the Post-It note) and press the trigger - you will hear another "bang".
- Another laser dot will appear - aim at it (bead on the laser dot) and press the trigger - you will hear a high confirmation tone (not a "bang") indicating that everything is now ready.
A low "uh uh" sound means the system is not happy with your shots. Check your measurements, check they were entered correctly and repeat the alignment process.
- A roundel (bullseye) will appear on the PC/laptop screen and the laser dot will remain in place. Aim and shoot at it to see the results on the roundel. Everything is OK if your shots are within the inner two rings.

- Click "Done" when you are ready to move on.
Important note: it is perfectly normal for the laser dots not to appear exactly at the centre of the Post-It note - this is all part of the calibration procedure.
You should carry out alignment at the start of every DryFire session and every time you fit the UGA. To do this select "Settings", "Calibration", "Alignment", "Align current shooter".
Your first shots
- Click on "Simulation", select "Trap", then "DTL" then "Start".
- Click on the triangular play symbol - this will change to a green microphone symbol.
- The software will "beep" when it is listening for you to call "Pull".
- Take up your normal shooting position with gun mounted and a hold position close to the first Post-it note .
- Call "Pull", acquire the laser target, swing through and fire.
- Congratulations - you have taken your first DryFire target.
- Don't worry if you missed - call "Pull" a few times to see where the target starts and where you would like to hit it. Make a note of your ideal hold point then try again. Don't forget lead!
Power supply
Always use the 5V DC power supply that comes with DryFire.
You may have other power supplies in your home and many of them will generate voltages that will damage DryFire. It is easy to pick up the wrong one - so take care.
Never use a different power supply with DryFire.
If, after installing the software, the simulator heads fail to nod up and down when you connect the USB and power cables, it is almost certain you have used the wrong power supply and caused damage.
Click here for more details.
Camera setup
You need do this only if your shots are not detected or the system is seeing stray shots.
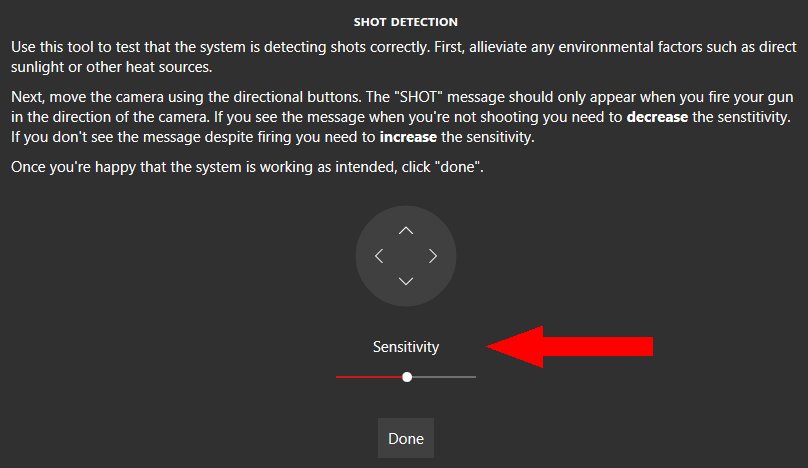
- Make sure no direct light reaches the wall/screen Check windows, doors, ceiling lights and wall lights - and possible reflections.
- From "Settings" select "Calibration" then "Adjust shot detection".
- Use the compass rose to move the camera head around and try shooting at the area it is pointing to. You should see the "SHOT" message if the system detects your shot.
- If your shot isn't detected, drag the white spot slightly to the right to increase the camera sensitivity then try again.
- You must find the maximum sensitivity without the system seeing background light.
- If you can't get the right setting there will almost certainly be stray light reaching the wall or screen.
Microphone setup

- From "Settings" select "Target release".
- Change the "Threshold" setting and call "Pull" - the word "Pull" will be shown in red next to the threshold value if the system hears your call.
- Continue adjusting the threshold until your call is heard.
During normal use
- The system starts listening after you have selected a simulation and after you have clicked on the triangular "Play" symbol on the control bar (top left).
- The system will beep, and the symbol will change to a green microphone, when the system is ready.
- After shooting at each target the results will be displayed and you should wait for the beep before calling for the next.
- Click here for ways to leave the results displayed for longer.
Software options: "Add-ons"
- After purchasing an add-on your invoice will include a token or key looking like this:
ABC123-DEF456-GHI789-JKL012.
- Keys are stored in the simulator's memory so ensure it is switched on and connected to the PC.
- Run the DryFire software.
- Select "Settings" then "Add-ons" and find the field labelled "Apply key".
- Enter the key provided with your invoice and click on "Apply".
- A tick will appear when the key has been applied.
- You now have access to all the features of the new add-on.
- A full list of the add-ons you have purchased is shown above the "Apply key" field.